Overview
UnionCam Manager
UnionCam Manager is a IP camera software which can support 64 cameras at the same time,
including Network camera, USB camera, capture card, and PC desktop etc. It can keep an eye on your home from anywhere, turning your
PC into a video surveillance system, remote controlling your IP camera via pan tilt zoom and preset function. This webcam software
can also broadcast live camera video on internet and your website with standard Flash stream or windows media stream, RTSP stream etc.
It can also support video motion detect and audio detect for Email alerts and recording, standard MP4, MOV, ASF, WMV, FLV, AVI, MKV
recording files. Other features include perfect user and password login management, Log information query, exporting software settings,
electronic map displaying.
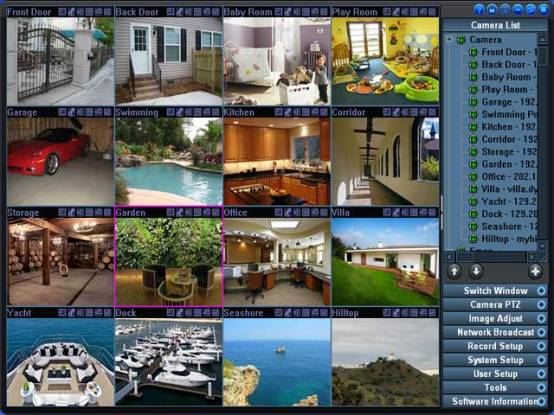
When you start UnionCam Manager software, you can view the
main GUI like the above picture. The left is video displaying region, the right
is toolbar region. You can hide or show the toolbar region at any time.
Maximize the GUI to fit your screen, hide the program to windows tray, or
arbitrarily change the GUI size via dragging. Exit the program and back to
window desktop.
1.
You need to configure some cameras in this software, select "camera List" menu in main GUI, and add some camera to camera list.
2.
You need to configure the record directory, select "Record Setup" menu in main GUI, and click "Record Parameter" Then you can add some
path to our "Record Path List"
3.
This software has three kinds of record method. You can
directly click the record icon in each video channel to start or stop the
manual record. The scheduled record and motion record is located at "Record Setup" menu.
Registration
When you download this software, and run at first, you will view the following registration dialog:

You can click "Trial Version" button to freely test in 30 days! After you purchase this software
and get the license code, you can input the code to this dialog, and click "Register Online" button, then it will show the channels capability
to you and become to the full version. This registration dialog will not been displayed when program start.
If you need to change the license code or register again, you can select "Tools" menu and click "License"
button, then it will show you this registration dialog again, you can re-input your license code, and click "Register Online" button again!
Toolbar
In our main GUI, you can view the following toolbar region:

There are 10 menus to be displayed, including all setup
dialogs. You can click a menu to display and switch. Such as you need to
configure the record parameters, you can click "Record Setup" menu, then it
will hide the other menu contents and only display the record menu contents. If
you need to PTZ control some network camera, you can click "Camera PTZ" menu,
then it will hide the record menu contents and only display the camera PTZ menu
contents!
You also can click the "Hide Toolbar" button to hide this
toolbar, or restore this toolbar displaying. This button is located at the left
of this toolbar.
1. Camera List
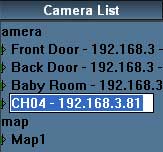
When you select camera list page, you can view the following user interface:
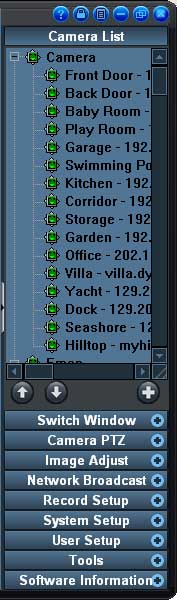 The camera list will display all cameras which have been configured. You can add USB camera, network camera,
or remote UnionCam Manager program to this list.
The camera list will display all cameras which have been configured. You can add USB camera, network camera,
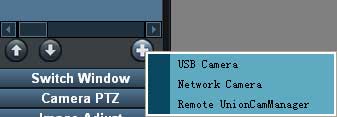
or remote UnionCam Manager program to this list.When you click  button, you can view the following menu:
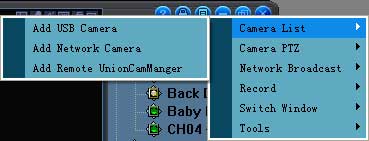
You also can click the right mouse on "Camera" in list, such as:
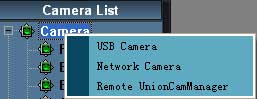
Then this add camera list will be displayed also.
The button  is "Move Up" you can select a camera in list, then click this button to move this camera up in list.
The button  is "Move Down" you can select a camera in list, then click this button to move this camera down in list.
When you click the right mouse on a camera in list, it will pop up a menu:

You can delete this camera from list, or duplicate a same
camera to list. Activate a camera in list or Inactivate a camera in list. If
you want to change some settings for a camera, or view the detailed settings of
this camera, you can select "Property" in menu.
Our software will set a default name "CH01" to a new add camera, but you can change this name in camera list.
1) Add USB Camera:

You can select a video source from list, and select a audio source from list. If you have some
capture card, you must install a WDM driver for it at first, then you can view
this device in video source list. If you have some camcorder, you can connect
to your PC at first, then restart our software and view this device in list.
2) Add Network IP Camera:

If your IP camera is located at local network, not connected
from internet, you can use our "Search in LAN" function. Now our software can
support some IP camera's automatically searching function. You need to select
the camera manufactory in list, then click "Search" button. If your network
camera can be listed with IP and port, you can click it to setup.
You also can directly select a camera in list and configure
it manually, select the camera manufactory at first, then select the detailed
model in list, our software will set the default parameter for you. But you
need to change some parameters to fit your camera settings.
3) Add Remote UnionCam Manager:

Our UnionCam manager program can connect another UnionCam manager program to view it's channel video from remote. So this program is a
network client, and also are network server. So you can build a huge video surveillance system with this IP camera software.
2.
Switch Window
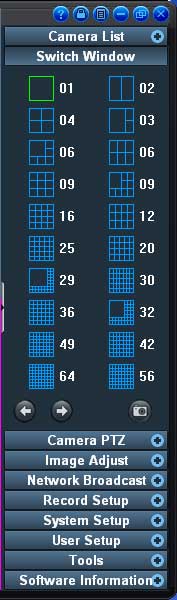 This software has setup 20 kinds of video window displaying mode. The left 10 buttons is 4:3 display mode, the right 10 buttons is 16:9 display mode.
When you click these buttons to change the display window, each channel's digital zoom
function will be restored to original!
3.
Camera PTZ
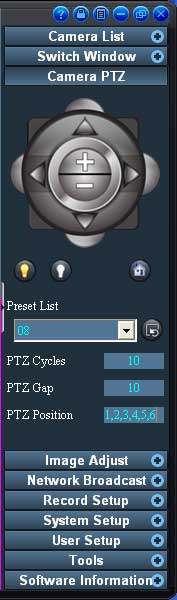 The camera PTZ page can pan tilt zoom and preset control the current focused channel camera. Now the USB or local
camera have no this function! Only for network camera which support these function.
The camera PTZ page can pan tilt zoom and preset control the current focused channel camera. Now the USB or local
camera have no this function! Only for network camera which support these function.If your camera support preset function, you can
use this software to automatically go to the preset camera position every a gap second such as 10 seconds etc.
PTZ position is a camera position list. 1,2,3,4,5,6 is moving camera to position 1,
then stop 10 seconds in this position, then moving camera to position 2 etc. Once it finished this list, one PTZ cycle is ok.
You can change the PTZ cycle at anytime! It will stop the automatically preset moving when this parameter is 0.
4.
Image Adjust
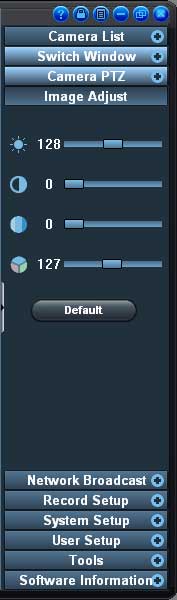 You can change the camera video color in this page, including USB cameras, and some IP cameras.
The default button is for restoring the camera video color to default status.
5.
Network Broadcast
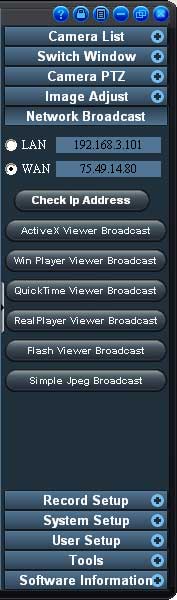 If you want to broadcast your camera video on your website, you can use this page to create some html web pages,
and copy these files to your website! Anyone can visit this webpage to view your camera video online!
If you want to broadcast your camera video on your website, you can use this page to create some html web pages,
and copy these files to your website! Anyone can visit this webpage to view your camera video online!You can broadcast your camera video on LAN or internet. You can click "Check IP Address" button to get your current
internet IP address. If you use DSL to reach internet, or other method which will change internet IP address often, you need to update
these web pages continuously. So you can use our DDNS function to create broadcasting files if you setup a DDNS domain in system setup dialog.
1) ActiveX Viewer Broadcast
This viewer mode can view many channel's video on one webpage at the same time. But you need to
install this ActiveX at the first time. And this viewer can only be supported in IE browser. Firefox or Safari can
not support it. In this webpage, you can click "Setup" button to configure the port and viewing channels etc.
2) Win Player Viewer Broadcast
This viewer will use Windows Media Player to view our channel video. You must install windows
media player at first on your PC. And you must set the record mode of this channel to ASF or WMV. Then you can
use Win Player viewer to view this channel video and audio from remote!
3) QuickTime Viewer Broadcast
This viewer will use QuickTime Player to view our channel video. You must install QuickTime
Player at first on your PC. And you must set the record mode of this channel to MP4 or MOV. It will connect to
our RTSP server to get audio and video stream.
4) RealPlayer Viewer Broadcast
This viewer will use RealPlayer to view our channel video.
You must install RealPlayer at first on your PC. And you must set the record mode of this channel to MP4
or MOV. It will connect to our RTSP server to get audio and video stream.
5) Flash Viewer Broadcast
This viewer will use Flash player to view our channel video. You must install Flash
Player at first on your PC. And you must set the record mode of remote channel is FLV.
6) Simple Jpeg Broadcast
This viewer will get the jpeg picture from our software continuously, so it can only support video not audio.
All these broadcasting mode need you to map the web server port 80 and RTSP server port 554 of this
program on your router for your PC.
6.
Record Setup
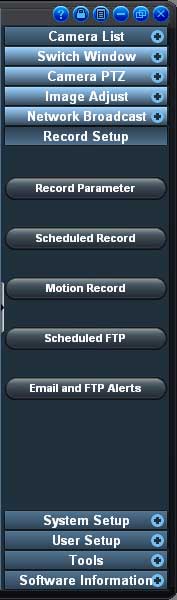 Record setup dialog have 5 settings in it.
1) Scheduled Record
If you want to start the recording function and end the recording via a timetable, you can
start the scheduled record. Such as you need to record in work time.

The beginning time must less than the ending time, otherwise it is an inactivated time. If you
enabled the scheduled record item, this program will check these two time segments continuously.
2) Motion Record
If you want to start the recording according to video motion, you can start the motion record.
You can use "Motion Test" button to test a suitable motion sensitivity value to fit your video condition. It will
be more easy to trigger the video motion if this value is more smaller.

This function include the pre-recording function, you can set the pre-record time from "Recording Time before Motion".
But this function need more CPU resource! There is no pre-recording if this parameter is 0.
3) Record Parameter
When you install our software and run at first time, you need to setup the recording path!
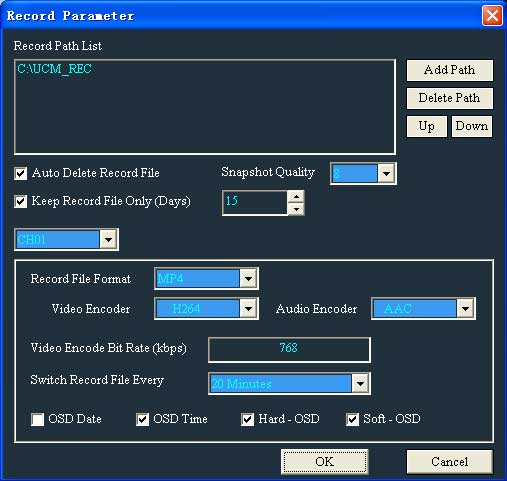
This software can support Soft-OSD function in MKV, MP4, AVI record file format. So if this
program receive H264 or Mpeg4 video stream from a IP camera, it can directly save these raw video stream to the record files,
and don't need to re-encode video, the record file still have OSD information. The Hard-OSD mode is embedding the OSD information
to video, and encoding this video to stream.
4) Scheduled FTP

5) Email and FTP alerts

7.
System Setup
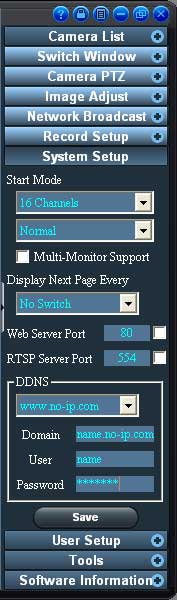 This page has some system setup.
1) Start Mode
When the program starting, it can display some channels video window, you can select to display
1 channel, 4 channels, 16 channels etc. And you can select the program hide to tray, or minimize, or full screen, or
normally display. When you enable the "Multi-Monitor" item, software can support multi-monitor, so you can move this
software from one monitor to another monitor. Otherwise, it can only be displayed in first monitor.
2) Display Next Page Every
Such as you only display one channel in window, and you want to automatically switch to next
channel every 5 seconds, so you can select a switch gap.
3) Web Server Port
This software have embedded a web server in it, so you can use IE browser or Firefox, Safari
browser to view the channel video from remote. You can change the web server port to avoid port conflicting.
You also can enable or disable the web server need to login function.
4) RTSP Server Port
This Software have embedded a RTSP server in it, so you can use QuickTime player or RealPlayer
or VLC player to view the channel video from remote. Such as:
rtsp://xx.xx.xx.xx:554/live.sdp?CH=2.
You also can change the default RTSP port from 554 to others. And enable the login function for RTSP server.
5) DDNS
This software can support DDNS function, so you can apply a user name, password and domain from:
dyndns.com, dyndns.us, changeip.com, no-ip.com, then input these information to this dialog and save. Then this software
can host this domain for you! And you can use this domain to visit our software from remote. This is very usefully for your dynamic internet IP.
8.
User Setup
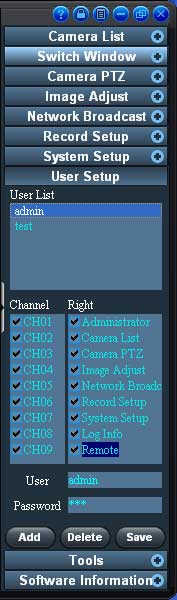 When you install and run this network camera software, no user have been add to user list. So you don't need to login when you start this program.
 If you need to protect your software, you need to create a user to list. Input the user name and password,
select the rights of this user, then click "Add" button. After you finish to edit the user list, please click "Save" button to save these settings!
If you locked this software or start this software after add some users, you can view the following
login dialog:

Input a user to login, then this software will provide all rights of this user to you.
The "Administrator" right has included all right of this software, so this user can create other user in
the user list. The user can only change his personal password in user setup page if he have no "Administrator" right.
9.
Tools
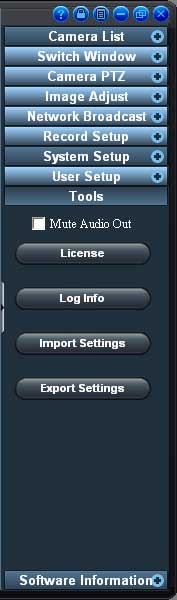 The tools page has 5 functions in it.
 1) Mute Audio Out
If you don't need to hear from any cameras, you can enable this item to mute audio out.
This selection will not influence the record files.
2) License
If you want to change the license code and register again, or upgrade the channels
capability from UnionCam and register again, you can click "License" button, and re-input your license code to register online.
3) Export Settings
You can click this button to export the current settings of program to a file, then
save this file to your drive. After you download the newest version and upgrade, you can import the old settings from this file.
This can avoid you to setup your camera one by one again.
4) Import Settings
When you click this button, you can select a configure file to import. After you
finish this and restart program, you can restore the old settings of our software.
5) Log Info
When you click the "Log Info" button, you can search the Software's
running log in the following dialog:

Selecting a begin time and a end time at first, enable some log type,
then click the search button, the log information will be displayed in above list.
10. Software Information
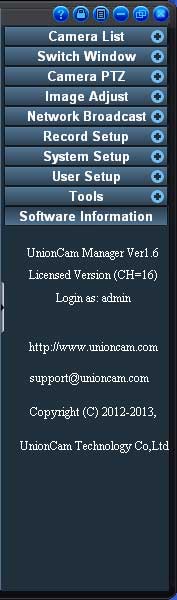 The software information page will show you:
 1) Software version.
2) Channels capability.
3) Current login user.
4) Company information and website.
5) Copyright.
Control Button
In our main GUI, you can view the following control buttons:
There are 6 buttons to be displayed.

The all menu have 6 sub-menus :
1) Camera List
You can add USB camera, Network camera or remote UnionCam Manager to software channel window.
2) Camera PTZ

You can Pan Tilt Zoom control the current focused channel camera.
3) Network Broadcast

You can create the broadcast webpage via 6 kinds of method.
4) Record
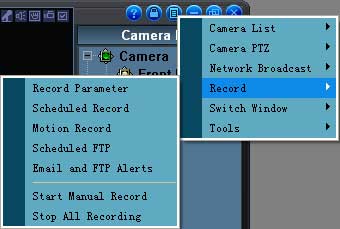
You can open the record parameter setup dialog, or scheduled record setup dialog,
or motion record setup dialog, or scheduled FTP setup dialog, or Email and FTP alerts setup dialog. You also can use this menu
to start all channel's manual recording or stop all channel's manual recording function.
5) Switch Window
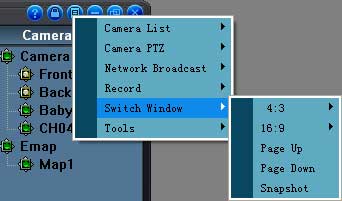
You can switch the display window to display only one channel or four channels or
sixty-four channels at the same time. And you can page up or page down the channel window displaying, snapshoting the current
focused channel video to a jpeg picture.
6) Tools

There are 7 tools can be used in this menu. Open the log information dialog to
search the program running logs. Import the old settings from a config file. Export the current settings to a config file.
View or change the license code and register online again. Make your all video window to full screen displaying. Mute the
software audio out.
You can drag the software window and change the window size, or move the
software window position, In this GUI size menu, you can change the GUI size to a fixed size.
Video Window
This software can display 64 camera video at the same time, so it have 64 channel capability. One
channel window can only display one camera video and one camera audio. Each channel is independently for each other.
The following picture is one channel window:

You can double-click this video with left mouse to maximize this video or restore this video. And can
right click mouse to make full screen for video window, or restore the GUI. You also can use the mouse wheel to magnify
the partial video, and use the left mouse to drag the video. This function look like a digital magnifier.
For each channel, you can view the following control icon:
It will display the channel title or other channel information in the front, and six channel status buttons.
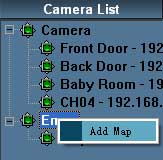
Emap
The Emap function is in camera list page. When you click right mouse on Emap tree node like below picture,
you can view the following menu to add a map.
You can select a JPG, BMP or GIF picture in your hard drive, then this picture will be add to the Emap list.

If you want to delete this map from list, you can click right mouse on this map tree node, then it will pop a delete map menu.
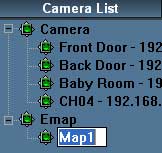
You can change the map name in list, click and click again on this map name.
When you double click left mouse on the map name in list, it will display this map for you like below:

Then you can drag a camera to this map at any position. Now the above picture have setup 4 camera in our
list, so you can drag these four camera to any position in map.
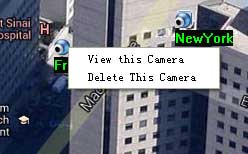
When you click right mouse on these camera in map, it will pop up a menu to view or delete this
camera from map. You can view each camera' status in this Emap function.